This is the recipe that removes every common failure point in home pizza making. No pizza peel. No stretching by hand. No launching onto a hot stone and praying the dough doesn’t stick. No shaping skills. No speed required. You press the dough into a cast-iron skillet, build the pizza at your own pace on the counter, and put the whole thing in the oven.
J. Kenji Lopez-Alt developed this recipe at Serious Eats, and it has become one of the most-reproduced pizza recipes on the internet for a reason: it works for complete beginners, it’s forgiving at every step, and it produces a pizza that’s genuinely good — thick, crispy-bottomed, with a tender crumb and bubbly cheese.
If you’ve never made pizza before, start here. If you’ve tried other recipes and failed at the launch, the stretch, or the timing — start here. Everything after this recipe is refinement. This is the foundation.
Why This Recipe Is Different
Most pizza recipes contain at least one step where things can go catastrophically wrong:
-
Stretching: High-hydration dough tears if you’re too aggressive. Low-hydration dough snaps back if you’re too timid. Kenji’s recipe: you press the dough into an oiled skillet with your fingers. No technique required.
-
Launching: Sliding a topped, wet pizza off a peel onto a 500F stone is the single most anxiety-producing moment in home pizza making. The dough sticks, folds over, dumps toppings onto the stone, and the smoke alarm goes off. Kenji’s recipe: the pizza never leaves the skillet. You build it in the pan and bake it in the pan.
-
Timing: Hearth pizza demands that you work quickly. Dough on a peel starts sticking within 60 seconds. You have to top fast, shake to confirm slide, and launch confidently. Kenji’s recipe: the dough sits in an oiled skillet. It’s not going anywhere. Take as long as you want.
The tradeoff is style — this is thick pan pizza, not thin Neapolitan or crispy New York. But within the pan pizza category, it’s excellent. The oiled cast iron fries the bottom into a golden-brown crust. The cold ferment develops flavor. And the high hydration produces an airy, focaccia-like crumb.
The Recipe
Yield: Two 10-inch pan pizzas.
Dough Ingredients
| Ingredient | Amount | Baker’s % |
|---|---|---|
| Bread flour (12.5-14% protein) | 400g | 100% |
| Water (room temp) | 275g | 68.8% |
| Fine sea salt | 10g | 2.5% |
| Instant dry yeast (IDY) | 4g | 1.0% |
| Extra-virgin olive oil | 8g | 2.0% |
Total dough weight: about 697g, divided between two 10-inch cast-iron skillets.
For scaling this recipe to different batch sizes, see baker’s percentages explained.
Why These Numbers
Bread flour. Not 00, not all-purpose. Bread flour at 12.5-14% protein provides the strong gluten network needed for a thick pizza with a 12-15 minute bake time. The longer bake at 550F demands structure that weaker flours can’t provide. King Arthur Bread Flour is the standard recommendation. For more on flour selection, see our pizza dough recipe by weight.
68.8% hydration. Wet enough for an open, airy crumb but not so wet that the dough is unmanageable when pressing into the skillet. Pan pizza hydration typically runs 70-75% — this is slightly lower, which makes it even more beginner-friendly while still producing excellent texture. For the full science on how hydration affects your crust, see the hydration guide.
2.5% salt. Moderate. Provides flavor without aggressively slowing fermentation.
1.0% instant dry yeast. Higher than a 48-hour cold-ferment recipe but appropriate for this method’s 8-24 hour window. The dough is designed to be mixed at night and baked the next day — or baked as early as 8 hours later if you’re in a hurry.
2.0% olive oil. The oil in the dough adds tenderness and richness. Additional oil goes into the skillet for the fried bottom crust.
Method
Evening (5 minutes of work):
-
Combine flour, salt, yeast, and olive oil in a large bowl. Stir briefly to distribute the yeast.
-
Add water. Mix with a wooden spoon or your hand until a shaggy dough forms and no dry flour remains. Do not knead. The dough will be sticky and rough — that’s correct. You’re making a no-knead dough. Time and hydration do the gluten development. For more on why this works, see pizza dough kneading.
-
Cover tightly with plastic wrap or a lid.
-
Refrigerate 8-24 hours. The dough develops flavor and structure in the cold. Eight hours is the minimum for adequate fermentation. Twenty-four hours is better. The flexible window is one of the recipe’s best features. For more on what happens during this step, see cold fermentation explained.
Bake Day (15 minutes before baking):
-
Prepare two 10-inch cast-iron skillets. Pour 2-3 tablespoons of olive oil into each skillet. Tilt to coat the entire bottom surface and about half an inch up the sides. The oil is going to fry the bottom of the crust — this is the technique’s secret weapon. A Lodge 10-inch cast-iron skillet is the standard recommendation and costs under $20.
-
Divide the dough in half (about 350g each) and place one portion in each oiled skillet.
-
Press the dough toward the edges with your fingertips. It won’t reach the edges immediately. That’s fine. Press it out as far as it goes, then let it rest for 10-15 minutes. Come back and press again. The gluten relaxes between pushes. Two rounds should get the dough to within a half inch of the edges.
-
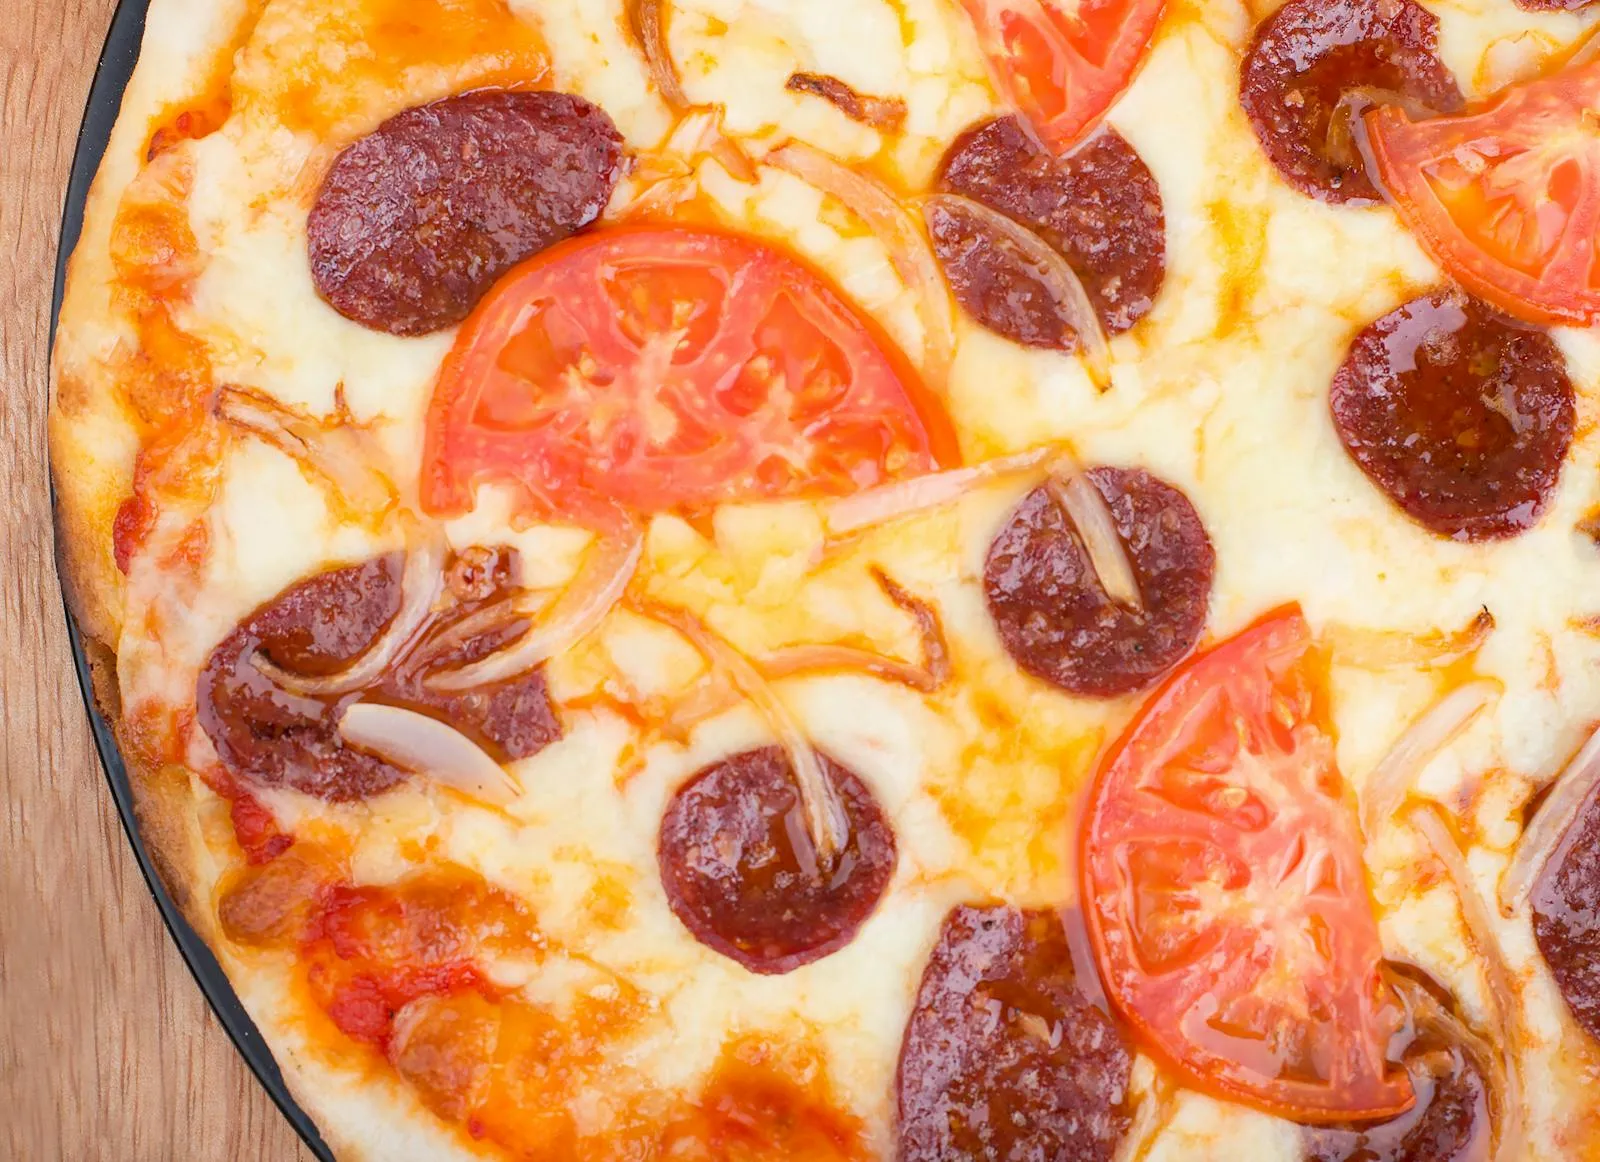
Top the pizzas. Sauce, then cheese, then toppings. Use aged (dry) low-moisture mozzarella — not fresh. Fresh mozzarella releases too much water during the longer pan bake, producing a soggy center. Grate the mozzarella from a block; pre-shredded has anti-caking agents that affect melting.
-
Let the topped pizzas sit at room temperature for 15-20 minutes while you preheat the oven. This temper step gives the dough a final burst of oven spring when it hits the heat.
Baking
-
Preheat oven to 550F (or your oven’s maximum). No pizza stone or steel needed — the cast iron is the baking surface. For more on baking pizza in a home oven, including preheat timing and rack positioning, see our dedicated guide.
-
Place both skillets on the middle rack.
-
Bake 12-15 minutes until the cheese is bubbly and beginning to brown, and the edges of the crust are golden.
-
Check the bottom: Lift the edge of the pizza with a spatula. The bottom should be deep golden-brown and crisp — fried by the oil, not just baked. If it’s pale, continue baking 2-3 more minutes. That golden-brown color comes from the Maillard reaction — the same chemistry responsible for a perfectly seared steak.
-
Remove from oven. Let rest in the skillet for 2 minutes, then slide or lift the pizza onto a cutting board. The oiled surface should release it cleanly.
Timing Schedule
| Time | Action | Duration |
|---|---|---|
| Evening | Mix dough (no knead) | 5 min |
| Evening | Refrigerate | 8-24 hr |
| Next day, 30 min before bake | Oil skillets, press dough | 10 min |
| Next day | Top pizzas | 5 min |
| Next day | Preheat oven | 15-20 min |
| Next day | Bake | 12-15 min |
Total active time: about 30 minutes across two days.
What to Expect
The bottom: This is where the magic happens. The generous olive oil in the cast-iron skillet fries the bottom of the dough during baking, producing a deep golden-brown crust that’s crispy on the outside and tender on the inside. It sounds like a cracker when you bite through it, then gives way to a soft interior. This is the same principle as Detroit-style pizza’s butter-in-pan method, executed in a round cast-iron format.
The crumb: Airy and open, with irregular holes. Closer to focaccia than to thin-crust pizza. The cold ferment develops gluten passively (no kneading needed) and generates enough gas for a substantial rise. The interior is light and pillowy, not dense or bready.
The edges: Golden-brown and slightly crispy from the oil, thicker than the center. A natural rim forms where the dough meets the skillet wall.
The cheese: Bubbly, beginning to brown in spots, fully melted. Low-moisture mozzarella holds its soft texture well after coming out of the oven — this is important for a pizza that sits in the pan for a few minutes before being cut.
The flavor: Noticeably better than same-day dough. The 8-24 hour cold ferment develops flavor compounds that quick dough lacks. Not as complex as a 48-hour Forkish dough or Gemignani formula, but substantially better than anything you can make in an afternoon.
Variations
Pepperoni pan pizza. Add pepperoni slices on top of the cheese. Natural casing pepperoni will cup at the edges during the longer bake — this is a feature.
Cheese-down (Detroit-influenced). Put the cheese directly on the dough (touching it, no sauce between). Sauce on top. This protects the dough from the sauce’s moisture, reduces the gel layer, and produces better cheese pull. Myhrvold endorses this assembly order as “a viable idea for most types of pizza.”
White pizza. Skip the tomato sauce. Brush the dough with garlic oil, add dollops of ricotta, scatter fresh mozzarella, and finish with pecorino and black pepper after baking.
Half-and-half. The two-skillet format is perfect for making two different pizzas — one for people who want pepperoni and one for people who don’t. Each skillet is its own independent pizza.
Tips
The cast iron is the baking surface. You don’t need a pizza steel or stone for this recipe. The skillet’s thermal mass provides enough bottom heat for a crispy crust. This is one of the recipe’s best features — it eliminates an equipment requirement that stops many beginners.
Don’t use a nonstick skillet. Cast iron’s thermal mass is what makes the fried bottom work. Nonstick pans are thinner and lighter — they don’t hold enough heat to fry the crust. A Lodge 10-inch cast-iron skillet is the standard recommendation and costs under $20.
Use aged (dry) mozzarella, not fresh. Fresh mozzarella (fior di latte) contains too much water for a 12-15 minute bake. It releases moisture that puddles on the pizza and makes the center soggy. Low-moisture mozzarella, grated from a block, melts evenly and stays soft long after the pizza comes out of the oven. Always grate your own — pre-shredded has cellulose anti-caking agents that affect texture and melting.
The 24-hour dough is better than the 8-hour dough. If your schedule allows it, mix the dough the night before and bake the following evening. The extra fermentation time develops more flavor and better browning. The 8-hour minimum is for convenience; 24 hours is for quality.
Scale up by adding skillets, not by making bigger pizzas. Each 10-inch skillet feeds 1-2 people. For a dinner party of 6, make three batches of dough in three skillets. They all bake simultaneously. This parallelization is another beginner advantage — you’re not sequentially launching and retrieving pizzas.
Sources: Lopez-Alt, Serious Eats (Foolproof Pan Pizza, skillet-broiler method); Forkish, The Elements of Pizza (hydration-oven matching, cold ferment science, pan pizza adaptation); Gemignani, The Pizza Bible (pan push-out technique, cheese selection); Myhrvold & Migoya, Modernist Pizza Vol 1 (cheese-down assembly endorsement, gel layer problem, optimal hydration for pan styles).
As an Amazon Associate, JayArr Pizza earns from qualifying purchases. Affiliate links help support the site at no additional cost to you.
Frequently Asked Questions
- Can I use a different pan instead of cast iron?
- Cast iron is strongly recommended because its thermal mass provides the aggressive, even bottom heat needed to fry the crust in olive oil. A standard nonstick skillet is too thin and light — it doesn't hold enough heat, and the bottom will be pale rather than deeply golden-brown. A 10-inch Lodge cast-iron skillet (under $20) is the standard recommendation. In a pinch, a heavy stainless steel skillet works, but it won't produce quite as dramatic a fried bottom.
- Why does this recipe use instant yeast instead of active dry?
- This recipe is designed for maximum simplicity. Instant dry yeast (IDY) mixes directly into the flour without blooming in warm water first — one fewer step. Active dry yeast would work if bloomed in a portion of the water first (use 5g ADY instead of 4g IDY — the standard conversion is ADY x 0.75 = IDY). The higher yeast percentage (1.0%) compared to long-ferment recipes (0.1-0.3%) is calibrated for the 8-24 hour window.
- The dough didn't reach the edges of the skillet. What do I do?
- This is normal and expected. High-hydration dough springs back when pressed. Push the dough toward the edges with oiled fingertips as far as it allows, then cover and rest 10-15 minutes. Come back and push again. Two rounds of press-and-rest usually get the dough within a half inch of the edges. If it still springs back after two rounds, let it rest 30 minutes at room temperature — the gluten needs more time to relax.
- Should I use fresh mozzarella or low-moisture?
- Low-moisture (aged, dry) mozzarella, grated from a block. Fresh mozzarella contains roughly 65% water — far too much for a 12-15 minute pan bake. The water releases during baking, pools on the surface, and makes the center soggy. Low-moisture mozzarella melts evenly, browns in spots, and holds its texture well after the pizza comes out of the oven. Always grate from a block — pre-shredded cheese contains cellulose anti-caking agents that affect melting.
- Can I make this with a pizza stone or steel instead of a skillet?
- That's a different recipe entirely. The whole point of this method is that the cast-iron skillet eliminates the peel, the launch, and the stretching. If you have a pizza steel and the skills to stretch, top, and launch confidently, you'd be better served by a 24-48 hour cold retard recipe designed for hearth baking — those produce thinner, more Neapolitan results. This recipe exists for people who don't have (or don't want) a steel and peel setup.
- My pizza bottom is pale, not golden-brown. What went wrong?
- Three likely causes. First, not enough oil in the skillet — you need 2-3 tablespoons per pan, enough to pool visibly on the surface. The oil is what fries the bottom; without enough, you're just baking, not frying. Second, oven temperature too low — this recipe needs 550F or your oven's maximum. Check with an oven thermometer; most home ovens run 25-50F below their displayed setting. Third, baking time too short — if the top looks done but the bottom is pale, continue baking. The cheese can handle a few more minutes.