Your gas grill can reach temperatures your kitchen oven can only dream about. Most home ovens max out at 500-550F. A standard three-burner gas grill, lid closed, will push past 700F. That puts you in the range where pizza starts behaving fundamentally differently — faster bakes, more oven spring, better char, and crust that’s crisp outside while still soft and moist inside.
The catch is that a grill isn’t designed for pizza. It heats from below (convection and direct radiation from burners) with indirect heat reflected off the lid. A pizza oven heats from above (dome radiation following the T-to-the-fourth-power Stefan-Boltzmann law) with a stable floor. You need to engineer around this difference, and there are two distinct approaches: baking on a stone or steel inside the grill, and grilling the dough directly on the grates.
Method 1: Stone or Steel on the Grill (Oven-Style)
This is the closer analog to a pizza oven. You’re using the grill as a high-temperature chamber with a dedicated baking surface.
Setup
Surface: Place a pizza steel or stone on the grill grates. Steel is preferred — its thermal conductivity is roughly 18-20x higher than cordierite stone, which means faster heat transfer to the dough base and better recovery between pizzas. A 1/4” or 3/8” steel works well. If using stone, go at least 1/2” thick for heat retention.
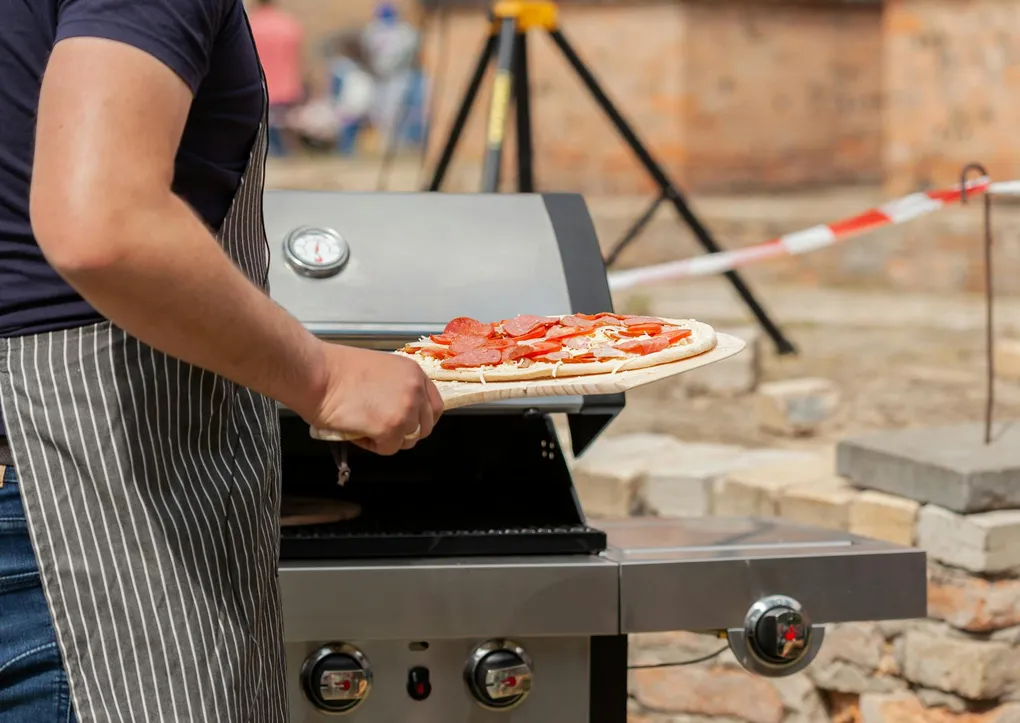
Two-zone configuration: Light burners on one side only (or center and one side). Leave at least one burner off. This creates a hot zone for initial baking and a cooler zone where you can move the pizza if the bottom is cooking faster than the top — a common grill problem since heat rises from below.
Lid positioning: The lid is your dome. It must stay closed during baking to trap heat and create the radiant energy that cooks the top of the pizza. Every time you open the lid, you lose a massive amount of accumulated heat. Myhrvold’s research demonstrates that thermal radiation follows a T-to-the-fourth power law — at 700F, you’re getting dramatically more radiant energy than at 500F. Opening the lid resets this.
Preheat Protocol
- Place steel or stone on grates, centered over the lit burners.
- Close lid. All lit burners on high.
- Wait 30-40 minutes minimum. Do not trust the built-in lid thermometer — these read air temperature at lid level, which is significantly hotter than the stone surface where your pizza actually bakes. Use an infrared thermometer aimed at the stone center.
- Target: 650-750F at the stone surface for Neapolitan-adjacent results, 550-600F for New York style.
Baking
- Build your pizza on a floured peel. Work fast — wet dough on a peel is a ticking clock. Use a 50/50 blend of flour and semolina for the peel surface. Semolina grains act as miniature ball bearings. At grill temperatures, regular flour alone can scorch and turn bitter.
- Open the lid, slide the pizza onto the stone/steel, close the lid immediately.
- Check after 2-3 minutes. Rotate 180 degrees with a metal turning peel if one side is cooking faster (guaranteed with most grill configurations).
- Total cook time: 4-6 minutes at 650-700F, 6-8 minutes at 550-600F.
- Watch the bottom. Grill heat rises from below more aggressively than a standard oven. If the bottom is charring while the top is still pale, reduce the flame or move the pizza toward the cooler zone.
Addressing the Top-Heat Problem
The fundamental challenge of grill pizza is insufficient top heat. Unlike a pizza oven or a home oven with a broiler, the grill lid sits far from the pizza surface and is a mediocre radiator. Solutions:
Raise the stone. Stack it on inverted cast-iron grates, bricks, or an extra grate to bring the pizza surface closer to the lid. Every inch closer to the lid increases the radiant heat reaching the top.
Use a pizza oven insert. Products like the KettlePizza (for charcoal grills) or BakerStone create a smaller enclosed chamber inside the grill, dramatically increasing dome radiation. These can push effective cooking temperatures above 800F and produce results approaching dedicated portable ovens.
Add a second heat source. Some grill setups position a small chimney starter full of lit charcoal on the grate next to the steel, providing radiant heat to the top of the pizza. This is more common with kettle grills but adaptable.
Method 2: Direct Grilling (Al Forno Method)
This is a completely different technique. Instead of baking pizza in the grill, you’re grilling the dough directly on the grates. The result is a distinct product — smoky grill marks on the crust, a slightly firmer texture, and a char that no oven can replicate.
Tony Gemignani credits the Al Forno restaurant in Providence, Rhode Island (opened 1980s) with popularizing this approach. His grilled pizza technique is the most detailed treatment in any major pizza book.
The Dough
Grilled pizza requires a specific dough. Gemignani developed a dedicated formula:
| Ingredient | Amount | Baker’s % |
|---|---|---|
| 00 flour (Caputo or San Felice) | 453g | 100% |
| Water (total) | 295g | 65.1% |
| Fine sea salt | 9g | 2.0% |
| Active dry yeast | 4.5g | 1.0% |
What’s missing: No malt, no oil, no starter. This is a deliberately stripped-down dough. Malt and sugar would accelerate browning on the direct-heat grates, causing burning before the dough cooks through. Oil would drip and cause flare-ups. The 65% hydration is lower than Gemignani’s standard 60-70% range — stiff enough to hold together on grates without sagging through.
Ferment: Rest 1 hour at room temperature, then cold ferment 24-48 hours. Shape into 255g balls (smaller than standard — grilled pizzas work best at 10-11 inches).
The Technique
-
Prep the dough: Roll out to 10-11 inches using a rolling pin. Dock the surface (prick with a fork in several places) to prevent large bubbles that could catch fire. This is one of the few pizza contexts where a rolling pin is preferred — you need even thickness and a degassed surface for grate contact.
-
Prep the grill: Clean grates thoroughly. Oil them lightly with a high-smoke-point oil on a wadded paper towel held with tongs. All burners on medium-high.
-
Flour only for dusting. Gemignani specifically warns against semolina for grilled pizza — at grill temperatures, semolina burns and turns acrid. Regular flour chars less aggressively.
-
First side (plain): Lay the dough directly on the grates. Close the lid. Cook 1-2 minutes until grill marks form and the bottom sets. The dough will puff slightly and become rigid enough to flip.
-
Flip. Using a large spatula or peel, flip the dough so the grilled side faces up. This grilled side is now your topping surface.
-
Top the grilled side. Move quickly. Add sauce, cheese, and toppings to the already-grilled surface. The dough is now cooking from below (raw side on grates) while the toppings melt from the residual heat and lid radiation above.
-
Finish covered. Close the lid for 30 seconds to 1 minute. The cheese should melt and the bottom should develop grill marks. Check frequently — the difference between perfect and burned is measured in seconds.
The Big Green Egg Advantage
Gemignani singles out the Big Green Egg (and by extension, other kamado-style ceramic grills) as his preferred grilling platform. The ceramic shell provides superior heat retention and dome radiation compared to a steel-walled gas grill. He bakes at 575-600F with a stone inside the Egg, producing pizzas in about 10 minutes — a middle ground between the fast grill-mark method and a traditional oven bake.
The key difference: a Big Green Egg at 575F with its ceramic dome produces significantly more radiant top heat than a gas grill lid at the same temperature. The thick ceramic walls absorb and re-emit thermal energy more effectively, approaching the performance of a dedicated pizza oven.
Dough Adjustments for Grill Baking
Whether you’re using a stone in the grill or grilling directly, grill environments demand dough tweaks:
Lower hydration (60-65%). High-hydration doughs (70%+) are fragile and difficult to handle in the fast-moving, high-heat grill environment. Forkish’s standard 70% home-oven dough would be difficult to manage on a grill. Gemignani’s grilling dough at 65% and his master dough at 61-65% are calibrated for this context.
Skip the malt. Diastatic malt powder accelerates Maillard browning. In a home oven at 500F, this is desirable — it compensates for the lower temperature. On a grill pushing 700F+, malt causes premature and uneven browning. Gemignani omits it entirely from his grilling formula.
Skip the oil in the dough. Oil on hot grates means flare-ups. Save the olive oil for drizzling after baking — it preserves the volatile flavor compounds that would burn off during grilling anyway. Myhrvold confirms that EVOO loses its distinctive flavor when baked, so drizzling after is both safer and tastier.
Shorter fermentation is acceptable. For direct-grill method, you’re getting char and smoke flavor from the grates. The flavor contribution of a 72-hour cold ferment, while still beneficial, is somewhat masked by the grill’s own flavor imprint. A 24-hour cold ferment is the practical minimum for decent complexity.
Temperature Management
The biggest operational challenge is temperature consistency. Unlike a 30,000-BTU pizza oven with a stable stone and insulated dome, a gas grill bleeds heat through every gap, is sensitive to wind, and has hot spots determined by burner placement.
Map your hot spots. Before your first pizza session, use an infrared thermometer to scan the stone surface at multiple points with the lid closed. Most three-burner grills have a 100-200F temperature gradient from back to front. Know where the hot zone is and plan your rotation accordingly.
Wind kills performance. Even a moderate breeze can rob a gas grill of 50-100F. Position the grill with the opening facing away from prevailing wind. A windbreak (stone wall, fence, grill cart positioned strategically) makes a meaningful difference.
Recovery time matters. After each pizza, close the lid, crank burners to high, and wait 3-5 minutes for the stone to recharge. Monitor with the IR thermometer — don’t launch the next pizza until the stone is back within 25F of your target.
Common Grill Pizza Problems
| Problem | Cause | Fix |
|---|---|---|
| Burnt bottom, raw top | All heat from below, insufficient lid radiation | Raise stone closer to lid; reduce flame; use two-zone setup |
| Dough sags through grates | Too wet, too thin, or under-proofed | Use 65% hydration or lower; roll thicker; ensure dough is fully proofed |
| Cheese not melting | Lid too far from pizza; too much ventilation | Move pizza to hottest zone; keep lid closed; raise stone |
| Crust too hard/dry | Bake too long at moderate temp | Increase heat, reduce bake time. Hotter and faster retains more moisture |
| Dough sticks to grates | Grates not clean or oiled; dough too wet | Clean and oil grates; use stiffer dough; flour (not semolina) |
| Flare-ups | Oil in dough, dripping cheese, or flour falling through grates | Use oil-free grilling dough; build pizza on peel, not over grates |
Is It Worth It?
If you already own a gas grill and don’t want to buy a dedicated pizza oven, the stone-on-grill method is an excellent way to break the 550F ceiling. You’ll outperform your home oven and get results that are noticeably closer to a real pizzeria. The direct-grilling method produces a uniquely smoky, charred product that no other cooking method replicates.
If you’re considering the grill primarily as a pizza platform, compare the total investment (good grill + steel + accessories) against a dedicated portable pizza oven like the Ooni Koda 16 or Gozney Roccbox. For pizza specifically, the dedicated ovens produce more consistent results with less technique overhead. But if the grill is already in your backyard and already paid for, a $60-130 baking steel is all you need to start.
Sources: Gemignani, The Pizza Bible (grilled pizza technique, Al Forno method, Big Green Egg, grilling dough formula, flour-only dusting); Myhrvold & Migoya, Modernist Pizza Vol 1 (thermal radiation physics, EVOO flavor loss during baking, baking surface conductivity); Forkish, The Elements of Pizza (steel vs. stone, hydration-oven matching).