The most common question in home pizza making — “how long should I proof my dough?” — has no single answer. Proofing time depends on yeast quantity, dough temperature, ambient temperature, flour strength, hydration, and whether you are doing a room-temperature proof or a cold ferment. A dough with 1% instant yeast at 80F might be ready in 3 hours. The same dough with 0.08% yeast at 40F might need 48 hours. Both can produce excellent pizza. One just has more flavor complexity than the other.
What you actually need is not a fixed time but a framework: understanding the two stages of pizza fermentation, knowing what to look for at each stage, and having a time-temperature matrix that lets you adjust to your specific conditions.
Two Stages: Bulk Ferment vs. Ball Proof
Pizza dough goes through two distinct fermentation phases, and this is where pizza diverges sharply from bread.
Bulk Ferment (Puntata)
This is the first rise — the entire batch of dough sits in one mass, covered, at room or cold temperature. During bulk ferment, yeast multiplies, produces CO2 and ethanol, and the gluten network develops through a combination of gas pressure and enzymatic activity.
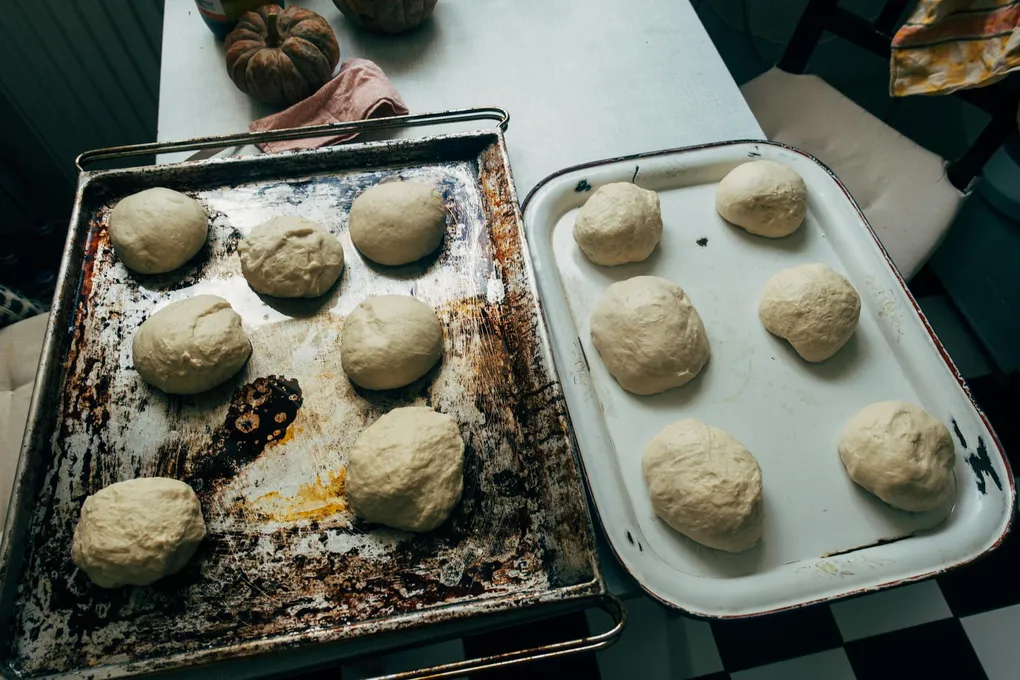
Ball Proof (Appretto)
After bulk ferment, the dough is divided and shaped into individual balls (panetti). These balls undergo a second fermentation — the ball proof — where gas continues to accumulate and the gluten relaxes into an extensible state.
The Critical Insight: Secondary Fermentation Matters More
Here is the key finding that separates good pizza from great pizza, drawn from Forkish’s synthesis of Neapolitan practice: most fermentation in pizza dough happens after the balls are formed, not before.
The Neapolitan model (codified by AVPN) calls for only about 2 hours of bulk ferment, followed by 6+ hours of ball proof. Enzo Coccia at La Notizia in Naples takes this to the extreme — he forms dough balls just 10-20 minutes after mixing, then lets them ferment for 10+ hours before service.
Why does this work? Less gluten organization at ball-shaping time produces a more delicate, less chewy crust. Long rest after shaping produces extremely extensible dough that stretches easily. Bread wants maximum volume from long bulk ferments and aggressive folding. Pizza wants delicacy, not volume. This is the opposite of bread technique, and it is one of the most important things to internalize.
Gemignani’s 24+24 method pushes this further with a refrigerated approach:
- Day 1: Mix, knead 2-3 minutes, rest 1 hour at room temp, then bulk ferment 24 hours in the fridge (expect only 25-50% rise, NOT doubling)
- Day 2: Degas briefly (30 seconds in a mixer on lowest speed), divide and ball, seal tightly, refrigerate another 24 hours
- Day 3: Temper to 60-65F (1-2 hours), stretch and bake
He tested this against a single 48-hour straight cold ferment and found the 24+24 split superior: “Baked up lighter, crispier, and more flavorful, with a stronger structure.” The degassing step promotes additional yeast reproduction and further fermentation.
The Time-Temperature Relationship
Masi and his co-authors provide the most precise quantification: a 1C increase in temperature (in the 20-35C range) accelerates fermentation speed by 8-12%. This single number is the key to adapting any recipe to your conditions.
If a recipe was developed at 70F (21C) and your kitchen is 80F (27C), fermentation will run roughly 50-70% faster. A 6-hour room-temperature proof becomes a 3.5-4 hour proof. If your kitchen is 65F (18C), that same proof stretches to 8+ hours.
Time-Temperature Matrix for Ball Proof
This matrix assumes standard pizza yeast quantities (0.2-0.5% IDY for cold ferment, 0.5-1% for room temp):
| Ball Proof Temp | Yeast (IDY) | Approximate Proof Time | Best For |
|---|---|---|---|
| 38-42F (3-6C) | 0.25-0.5% | 24-72 hours | Maximum flavor complexity, scheduling flexibility |
| 55-65F (13-18C) | 0.2-0.5% | 6-12 hours | Moderate flavor, next-day pizza |
| 68-72F (20-22C) | 0.1-0.3% | 4-8 hours | Same-day Neapolitan (AVPN model) |
| 75-82F (24-28C) | 0.5-1% | 2-4 hours | Quick dough, minimal planning |
Why Cold Ferment Produces Better Flavor
At refrigerator temperature (4C / 39F), yeast drops to roughly 10% of its room-temperature activity. But enzymes — amylase, protease, and lipase — retain 40-50% of their activity. That means enzymes are 4-5 times more active relative to yeast in the cold than at room temperature.
The practical result: cold fermentation allows enzymatic breakdown (maturation) to proceed while yeast-driven gas production creeps along slowly. Amylase converts starch to sugars. Protease breaks proteins into amino acids (enabling Maillard browning and producing glutamates for umami). Lipase generates fatty acids for subtle complexity. Over 50 distinct flavor compounds form during cold fermentation that do not exist in quick dough.
The timeline for cold fermentation flavor development:
| Duration | Result |
|---|---|
| 24 hours | Noticeable improvement over same-day |
| 48 hours | Robust complexity, very extensible dough |
| 72 hours | Peak complexity, diminishing returns begin |
| >72 hours | Risk of structural degradation, off-flavors from excessive acidity |
Cold ferment also enhances Maillard browning in the oven — more free amino acids and more free sugars from enzymatic breakdown means more reactants available for browning. But excessive acidity (beyond 72 hours) paradoxically slows Maillard. The sweet spot is 48-72 hours.
How to Tell When Dough Is Ready
Time is a guideline. The dough itself is the authority. Here are three reliable readiness tests, drawn from multiple sources.
The Poke Test
Press a floured fingertip about 1/2 inch into the dough ball and observe:
- Springs back immediately: Under-proofed. Gluten is too tight, gas pressure is insufficient. The dough needs more time.
- Springs back slowly (2-3 seconds) and mostly fills in: Ready. This is the sweet spot — enough gas for oven spring, enough gluten structure to hold shape.
- Stays indented (no spring-back): Over-proofed. The gluten network has degraded too far to spring back. Gas may have started escaping.
Iacopelli describes the ready state as dough that feels “full of air” and “light.” The poke indentation slowly returns but does not completely fill.
Volume Tracking
The most reliable objective measure. Mark the starting level on your container and look for specific increases:
- Bulk ferment target: 50-100% increase (Masi specifies loaf volume should increase 50% by end of second ferment; Gemignani says expect only 25-50% in the fridge, NOT doubling)
- Ball proof target: The ball has visibly expanded, surface is smooth and slightly domed, small bubbles visible on the surface or when you turn the ball over
Myhrvold recommends volume tracking over the float test for sourdough starters, and the same logic applies to dough balls: volume is objective and observable, while the poke test requires calibrated feel.
The Underside Check
Turn a proofed dough ball over and look at the bottom. Ready dough shows small, gassy holes — evidence of active fermentation. If the bottom is smooth and dense, the dough needs more time.
Masi’s Four Phases of Leavening
Understanding what is happening biochemically helps you read your dough:
- Lag phase: Yeast synthesizes new cellular components. No visible volume change. This is why dough does not rise immediately after mixing.
- Exponential phase: Rapid yeast division. The biggest volume increases happen here. This is the productive window.
- Stationary phase: Growth stops. Vital cells reach equilibrium between division and death. Volume plateaus. Optimal leavening is reached at approximately 3/4 of maximum dough volume.
- Decline phase: Nutrients are depleted. Toxic metabolites (acids, alcohols) build up. Structure collapses. Off-flavors develop.
The critical takeaway: you want to bake during the late exponential or stationary phase — not at maximum volume. Dough at peak expansion is already teetering on decline. A dough ball at 75% of its maximum rise is more structurally sound than one at 100%.
Maturation vs. Fermentation: They Are Not the Same
Masi draws an important distinction:
- Fermentation = yeast producing CO2 and expanding the dough (gas production)
- Maturation = enzymes splitting complex molecules into simpler ones (flavor and texture development)
Strong flour (high W value, 300+) needs longer maturation. The enzymatic processes need time to break down the robust gluten network. These doughs should be stored at low temperature to slow fermentation without stopping maturation. Proofing time: 24-48 hours.
Weaker flour (W 200-250) matures faster. Maturation completes in 8-12 hours at appropriate temperature.
Properly matured dough stretches without snapping back and without tearing. Insufficiently matured dough is elastic and fights you. Over-matured dough tears and develops holes.
Over-Proofing: Signs and Rescue
Signs of Over-Proofed Dough
- Dough ball is saggy and flat rather than domed
- Poke test: indentation stays, no spring-back
- Surface is loose, wrinkled, or bubbly
- Alcoholic or excessively sour smell
- Dough tears easily when stretched
- Forkish: “the dough expands too much, loses its integrity, and gets too full of hot air”
Rescue Strategies
Over-proofed dough is not necessarily ruined:
- Re-ball it. Iacopelli’s advice: gently reshape the dough (releasing excess gas), let it rest for 1 hour, and it recovers. The gluten may have weakened but can still produce acceptable pizza.
- Use it for pan pizza. Over-proofed dough that has lost its structure for hearth pizza can still work in a pan (Detroit or Sicilian), where the sides provide support.
- Bake it immediately and accept the result. A slightly over-proofed pizza is flat and may lack oven spring, but it can still taste fine — especially with good toppings.
Prevention
- Cold dough from fridge: temper carefully. Pull balls 1-2 hours before baking for a gentle return to workable temperature (60-65F per Gemignani). Do not leave them at 80F for 3 hours.
- Proofing humidity: Masi specifies 70-80% relative humidity. Below 70%, the dough surface dries and forms a skin that cracks during shaping. Forkish’s simpler instruction — “cover the dough” with plastic wrap or a damp towel — achieves the same goal.
- Match yeast to timeline. If you keep over-proofing, you are using too much yeast for your conditions — see our dough recipe by weight for tested starting ratios. Cut yeast by 25-50% and extend the proof time. Myhrvold’s advice: never adjust salt to control fermentation speed — salt is a flavor ingredient with a fixed optimal percentage. Adjust yeast quantity or dough temperature instead.
Quick Reference: Proofing by Style
| Style | Bulk Ferment | Ball Proof | Total Time | Key Notes |
|---|---|---|---|---|
| Neapolitan (AVPN) | 2 hr at 25C | 4-6 hr at 15-20C | 6-8 hr | Room temp only; short bulk, long ball proof |
| Forkish Saturday | 2 hr at RT | 6 hr at RT | ~8 hr | Same-day; 0.3g IDY for 500g flour |
| Forkish 24-48hr | 2 hr at RT | 16-48 hr cold | 18-50 hr | Most-used recipe; 1.5g IDY for 500g flour |
| Gemignani 24+24 | 24 hr cold | 24 hr cold (after degas) | ~50 hr | Degas between stages; temper to 60-65F before baking |
| Iacopelli Double-Fermented | 16-24 hr cold | 1-2 hr at RT | ~20 hr | Poolish-based; balls placed upside down |
| Quick dough | 1-2 hr at RT | 1-2 hr at RT | 2-4 hr | Higher yeast; serviceable but less complex |
The best proof time is the one that fits your schedule AND matches your yeast quantity and temperature. There is no universally correct answer — only the answer for your specific dough, in your specific environment, today.