The difference between a good pizza and a great one is often decided in the final ten seconds — after the pizza leaves the oven. A drizzle of good olive oil, a scatter of fresh basil, a pinch of flaky salt. These finishing touches are where amateurs most reliably undershoot. Either they add delicate fresh herbs before baking (destroying them) or they skip the post-bake entirely (missing the easiest flavor upgrade available).
The science is straightforward: fresh herbs and dried herbs behave completely differently under heat, and each has an optimal moment in the pizza-making process. Get the timing right and you layer aromatic complexity on top of already-great pizza. Get it wrong and you waste expensive ingredients.
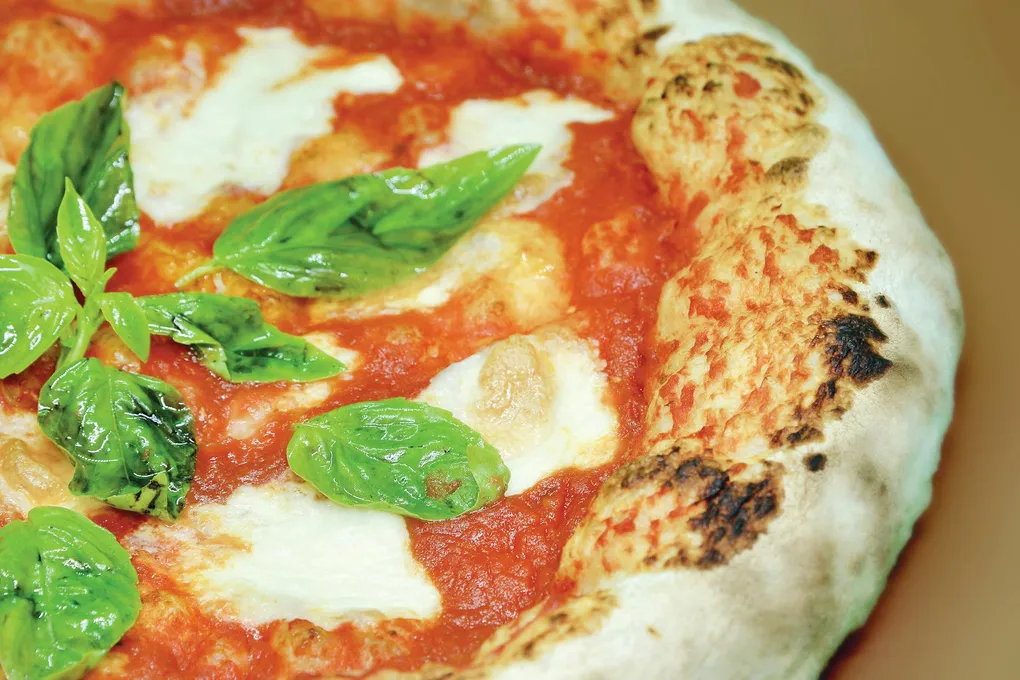
Fresh Basil: After the Oven, Not Before
Fresh basil is the iconic pizza herb, and it is also the one most commonly mishandled. The mistake is putting whole basil leaves on the pizza before it goes into the oven.
Why Fresh Basil Burns
The aromatic compounds that make basil smell and taste like basil — primarily linalool, eugenol, and methylchavicol — are volatile oils that begin degrading above roughly 350F (175C). In a 550F home oven, these compounds flash off within the first minute or two of baking. What remains is a blackened, bitter leaf with none of the bright, peppery-sweet character you wanted.
Even in a 90-second Neapolitan bake at 900F, fresh basil loses significant aroma. The traditional Margherita places basil leaves on before baking because the extremely short bake time limits (but does not eliminate) degradation. At home oven temperatures and bake times (7-12 minutes), the destruction is nearly total.
The Correct Approach
Tear fresh basil by hand and place it on the pizza immediately after slicing. Not after baking and before slicing — after slicing.
Gemignani codifies this as his Commandment #9: finishing ingredients go on after slicing. The reason is both aromatic and visual. Placing basil on a whole pizza and then cutting through it with a wheel or knife bruises the leaves, causes premature oxidation (browning), and distributes the herb unevenly. Placing torn basil on individual slices means each piece gets a proportional amount of fresh, vibrant herb. [Gemignani, Master Class]
For fresh-topped pizzas that include prosciutto, arugula, or shaved Parmigiano alongside basil, Gemignani slices first, then tops each wedge individually. This preserves the height and visual appeal of delicate toppings. [Gemignani]
Varieties Worth Knowing
- Genovese basil: The standard Italian large-leaf variety. Sweet, peppery, anise-tinged. The default for Margherita and most Italian-style pizzas.
- Thai basil: More licorice-forward, slightly spicy. Works on unconventional pizzas with Asian-inspired toppings.
- Purple basil: Milder, slightly more clove-forward. Visually striking on white pizzas.
Use what you can find fresh. Dried basil is a poor substitute — the drying process destroys the same volatile compounds that heat destroys, leaving mainly fiber and a faint, dusty approximation of basil flavor.
Dried Oregano: Before or During Baking
Dried oregano is the opposite of fresh basil in almost every way. Where basil needs to be protected from heat, dried oregano needs heat to unlock its potential.
Why Dried Herbs Need Heat
Drying concentrates and partially encapsulates aromatic compounds within the herb’s cellular structure. Heat — either from the oven or from contact with hot sauce — breaks open these cellular walls and “blooms” the essential oils, releasing them into the surrounding food. Without heat activation, dried oregano tastes papery and flat. With it, the thymol, carvacrol, and rosmarinic acid that define oregano’s character come alive — a form of Maillard-adjacent flavor activation that transforms dried herbs.
Where Dried Oregano Goes
In the sauce: The simplest and most common approach. Add dried oregano directly to your pizza sauce during mixing. Even a no-cook sauce (which Forkish, Gemignani, and Iacopelli all recommend as the default) benefits from dried oregano stirred in at least 30 minutes before use, allowing the herb to hydrate and begin releasing its oils into the tomato base.
On the pizza before baking: Sprinkle dried oregano directly on the sauce or cheese before the pizza goes into the oven. The baking heat blooms the herb during the cook. This produces a slightly different character than sauce integration — more surface-forward, slightly toasty, with small crunchy herb flecks.
On the pizza after baking (Gemignani method): A light pinch of dried oregano scattered over the finished pizza as a finishing herb. This gives you the visual fleck effect and a burst of unbloomed aroma that contrasts with the cooked elements. Gemignani uses this approach for his finishing step alongside grated cheese and garlic oil. [Gemignani]
Fresh vs. Dried Oregano on Pizza
Fresh oregano exists and is available at some grocery stores. It is a different ingredient than dried oregano — milder, grassier, less concentrated. Fresh oregano can go on pizza either before (for mild, cooked herb flavor) or after (for gentle fresh herb notes). It does not replace dried oregano’s punch. Most pizza makers — including Gemignani, who uses oregano extensively — default to dried.
Greek oregano (Origanum vulgare subsp. hirtum) is the strongest, most aromatic variety. Gemignani specifically calls for “Greek oregano” in his Sicilian sauce for “East Coast flavor.” [Gemignani] If you are buying dried oregano and want maximum impact, look for Greek or Mediterranean varieties rather than Mexican oregano (Lippia graveolens), which is a completely different plant with a different flavor profile.
Garlic: A Timing Problem
Garlic on pizza requires more care than most toppings because it is so temperature-sensitive.
Raw Garlic
Thin-sliced or minced raw garlic placed on pizza before baking will burn in any oven above 450F if exposed. The sugars in garlic begin caramelizing rapidly around 325F and transition to acrid, bitter char around 375-400F. In a 550F home oven with a 7-8 minute bake, exposed garlic goes from raw to burnt in about 3 minutes.
Mitigation: If you want garlic on pizza before baking, slice it very thin (transparent slices with a sharp knife or mandoline) and tuck it under the cheese layer where it is protected from direct radiant heat. It will cook gently through conduction from the surrounding cheese.
Roasted Garlic
Roast a whole head (cut off the top, drizzle with olive oil, wrap in foil, 400F for 40-45 minutes) and squeeze out the soft, caramelized cloves. Roasted garlic can go on pizza before or after baking — it is already cooked, so heat will not damage it further. Its flavor is sweet, mellow, and deeply savory.
Garlic Oil
The most versatile garlic delivery system for pizza. Warm (do not boil) sliced garlic in olive oil over low heat for 10-15 minutes until fragrant and pale gold. Strain. Use the infused oil as a post-bake drizzle or brushed onto the cornicione immediately after the pizza exits the oven.
Gemignani uses garlic oil as a standard finishing ingredient, drizzled over the pizza after slicing. [Gemignani] This gives you clean garlic flavor without any risk of burning.
Food safety note: Garlic-in-oil mixtures can support botulism growth if stored at room temperature. Refrigerate garlic oil immediately and use within 1-2 weeks. Alternatively, make fresh each pizza night (the heat time is minimal).
Finishing Oils: The Post-Bake Power Move
Extra-virgin olive oil behaves counterintuitively on pizza.
EVOO Before Baking
When baked into pizza, EVOO loses much of its character. The volatile compounds that give good olive oil its fruity, peppery, grassy notes evaporate during baking. Masi’s research measured approximately 30% reduction in phenolic compounds during even a 90-second Neapolitan bake at 400C. In a 7-minute home oven bake, the loss is more substantial. [Masi pp. 94-95]
What remains after baking is the oil’s structural properties — lubrication, moisture retention, and some antioxidant capacity — but not its signature flavor. This is why Myhrvold notes that cheap pure olive oil is functionally equivalent to expensive EVOO when mixed into dough. The flavor premium of EVOO is lost to heat. [Myhrvold p. 354]
EVOO After Baking
A drizzle of good EVOO on a pizza immediately after it exits the oven is one of the simplest, highest-impact moves in pizza making. The residual heat of the pizza gently warms the oil, releasing its volatile aromatics without destroying them. The oil’s fruity, peppery, and slightly bitter character integrates with the cheese and sauce in a way that is impossible to achieve if the oil is baked in.
This is standard practice in Roman pizza — al taglio gets “brushstrokes of olive oil after baking.” [Forkish Ch2] It is also Gemignani’s default finishing technique. And Masi’s research confirms that adding EVOO after baking maximizes its bioactive components and nutritional value. [Masi pp. 94-95]
Choose your EVOO by intended use:
- For dough and pre-bake: Pure olive oil or a mid-range EVOO. Flavor will be muted by heat.
- For finishing: Your best, freshest, most flavorful EVOO. This is where quality shows.
Gemignani recommends Filippo Berio or Corto for all-purpose EVOO (fruity, not too grassy or peppery). Pure olive oil (not EVOO) for sauteing at higher heat. [Gemignani]
Chili Flake and Heat
Dried red pepper flakes (peperoncino) can go on pizza before or after baking, with different results:
Before baking: The heat from the oven blooms the capsaicin-carrying oils and toasts the flake edges. Creates a deep, integrated heat that permeates the sauce and cheese. This is the traditional approach for a diavola or fra diavolo style.
After baking: Sharper, more surface-level heat. The flakes retain more of their fruity, slightly smoky character when not baked. You taste both the pepper flavor and the capsaicin heat as distinct elements.
Calabrese peppers (jarred, in olive oil with herbs and vinegar) are Gemignani’s secret weapon — he calls them “magic peppers” and uses them in his Calabrese Honey Sausage and on various topped pizzas. They contribute three-source heat (red pepper flakes + crushed Calabrese + fresh serrano) that is complex rather than merely hot. [Gemignani]
Other Herbs and Aromatics
Rosemary
Too woody and resinous for most pizza. Where it works: focaccia (added before baking, protected by oil), white pizzas with potato and sausage (chopped fine and scattered before bake). Whole sprigs should be removed before eating — they do not soften during baking.
Thyme
Fresh thyme leaves stripped from stems can go on pizza before or after baking. More heat-stable than basil — retains much of its character through a home oven bake. Works well on white pizzas, mushroom pizzas, and anything with goat cheese.
Arugula
Strictly a post-bake topping. Arugula wilts instantly under heat. Place a handful of fresh arugula on the pizza immediately after slicing. The residual heat causes slight wilting that is pleasant; direct oven heat destroys it. Classic pairing: prosciutto, arugula, shaved Parmigiano, EVOO drizzle.
Fresh Mint
Surprisingly good on pizza, particularly with lamb, eggplant, or feta. Treat like basil — add after baking. Volatile oils are fragile.
Microgreens
Purely a finishing element. Never bake. Scatter on individual slices for visual and textural contrast.
The 10-Second Protocol
Here is a practical sequence for the critical moments after your pizza exits the oven:
- Pizza comes out of the oven. Place on a cooling rack or cutting board (Iacopelli recommends a cooling rack to prevent soggy bottom from trapped steam). [Iacopelli]
- Immediately: Drizzle finishing EVOO over the surface.
- Immediately: Brush garlic oil on the cornicione if desired.
- Wait 15-30 seconds for the surface to cool from “destroy everything” to “warm enough to wilt but not kill.”
- Slice the pizza.
- After slicing: Scatter torn fresh basil, pinch of dried oregano (if using as finisher), flaky salt, grated Parmigiano or Pecorino, arugula, prosciutto, or any other fresh finishing toppings.
- Serve immediately.
The entire post-bake sequence takes 30-60 seconds. In that time, you add more aromatic complexity than most recipe adjustments could achieve. The herbs, oils, and finishing elements are exposed to just enough residual heat to activate their flavors without destroying them.
This is the window that matters most, and it costs nothing extra in ingredients — only a small amount of attention and timing.